How to Make a WordPress Website
[ad_1]
Trying to figure out how to create a website? Today you will find out!
An easy step-by-step website setup guide written by web developers who have created hundreds of websites and helped thousands of others to create their own website.

6 reasons why you’ll love this awesome website setup guide:
This guide is very detailed, comprehensive and easy to follow even if you’re not tech-savvy.
This guide is updated weekly to keep up with the latest web design trends.
Within an hour your website will be up and running and is going to be responsive and mobile-friendly.
Platform-Specific
Your website will be based on the right platform and in the right way.
We guarantee that by the end of this guide you’ll have a working website
Free Support
We are open for questions. Drop a comment below with your question and we will be happy to help
At Colorlib we spend a great deal of time reviewing products and providing good reading content for our readership. Many of them are familiar with the workings of a website running on WordPress. This guide is intended to help anyone who is creating their first website, likely with WordPress. It’s the platform we recommend and use for our website.
A step-by-step tutorial – we start off with finding the right content management system, choosing a domain name, then the right web hosting service, adding the right themes, plugins and customizing your site’s appearance. By the time you are done with this how to make a WordPress website for beginners guide you’ll have a full-fledged website ready to go!
This guide contains three simple and easy-to-follow steps:
Choose the right platform for your website
STEP 2
Choose the right website name (domain) and hosting
STEP 3
Configure your newly created WordPress website
Choose the right platform for your website
What is a Content Management System?
A content management system (CMS) in simple terms, is a platform of sorts or a mechanism which permits you to create your content and publish it on a website. Let’s say that it is a coat hanger stand with the coat being your content.
It is software that is installed on your host’s server. Your host provider will likely have a one click installation process to help you get your CMS installed. Once it is installed, you can log in to your site as the admin and add photos, text and other content. You can use the content you’ve added to create blog posts and other forms of content like a product page or display a work portfolio on your website.
A CMS is way more than just a means to an end, you can install a theme which is a modified template to suit the specific niche and purpose of your site. With the template added, you can customize the appearance of your site. You can add plugins to add function to your site, for example a social sharing plugin to help spread the word about your site via social networks.
All of this and more can be accomplished with a Content Management System.
Which CMS is best for you?
An overwhelming majority of websites use WordPress. The other two options that lag way behind in comparison to WordPress (certainly in popularity) are Joomla and Drupal.
WordPress
The ideal option for someone who’s creating his or her first website. It has considerable scalability and works well with low and medium traffic websites. We receive 1.5 million views every month and we run WordPress, so that gives you an idea of what medium traffic constitutes if you were wondering. Even large websites such as TIME Magazine, CNN, TED, Techcrunch, NBC and others use WordPress to server millions of pageviews each day.
WordPress has a great number of points that can be made in favor of its use.
- Easy To Install: Most hosting services have one click installation options for WordPress given the number of people who use it.
- Strong Community & Open Source: It is free and used by a lot of people. There are a plethora of free themes and plugins that you can leverage for your site. Apart from the freebies, premium themes and plugins are cheap and come with excellent support services from their providers. If you ever have a doubt or a problem a simple Google search can answer your query. If fact, I’ll go so far as to say you’ll find the answer to your doubts answered by the first three results of a Google search. A strong community will aid in your WordPress initiation process should you ever encounter any hiccups. And you can always drop your comments here either Aigars or me will be sure to respond to the at the earliest opportunity.
- Ideal For Non tech savvy online entrepreneurs: Most of the products associated with WordPress, such as themes and plugins are fairly straightforward and intuitive to use. Installing a Content Management System like WordPress is only the first step of the process, there is much more to website creation beyond that. Like WordPress which is easy to install and configure, the tools that you’ll require to make your website whole are easy to handle.
Two not so quite favorable things about WordPress
- One drawback of WordPress, it may become unwieldy if your site grows far too large and receives an enormous amount of daily traffic. The cost of your hosting goes up. But we are talking about traffic in the order of millions here and it isn’t something you should let bother you for now.
- Another potential problem is the quality of free plugins and themes. While most are good and have fairly high security standards, you’d should be wary of unknown third party plugins. WordPress is a secure platform out the box, but adding third party software while exercising poor judgement is a bad idea. That being said security vulnerabilities are generally fixed as soon as they are detected.
As you can see WordPress is by far the most popular content management system and is used by 65% CMS powered websites worldwide.
The thing you need to know is all CMSs have one drawback or the other. And for a new web admin, WordPress is the best way to go! But I’ll talk about Drupal and Joomla, all the same. You should certainly be aware of them, should you decide to switch your CMS at a later point in time. And it will also tell you why perhaps Joomla and Drupal are not best suited to the needs of beginner.
Drupal
Unlike WordPress, Drupal is not too well suited for the technically inept or a first time website developer. Drupal is an open source CMS and is largely utilized by big corporations with vast websites and high traffic loads. It has its own customization possibilities with themes and plugins created to add value to Drupal sites. Drupal websites are a bit faster and little less taxing on the host’s server resources.
But if you’re new to web development, it isn’t for you. Why? It is more complicated than it needs to be to meet your requirements. It is designed for complex, vast websites with high traffic loads, which your new website will not be to begin with. Given that, there is no need to add to the difficulty of the website creation process unnecessarily. And besides, you can always switch to Drupal at a later date.
Joomla
Open source and free like the previous two platforms. It is a tad better than the other two when it comes to creating a community of users (like a small social network or tight knit community for your readers) and is far more amenable to creating social websites with a lot of interaction and engagement from users. It is easier to handle than Drupal and offers more than WordPress in terms of performance and tweakability.
And again my reasons are the same for not recommending it for you, unnecessary complication that you do not need.
WordPress – Probably the best option for you!
If you are starting off with a new domain name with no traffic so to speak of, you are better off with WordPress. It is exceedingly easy to use, it is free and comes with an enormous number of premium quality free themes and plugins. The cost of hosting is low and many hosts provide for easy one click installation of WordPress. And since a growing percentage of online entrepreneurs do not know how to program in HTML, CSS and PHP, WordPress is the best choice as it offers excellent customizability even to WordPress newbies.
Click here to summarize, why WordPress is the best choice, if you still harbour any lingering doubts. (Optional)
- Free – Who isn’t happy about this?
- Strong Community – Someone to answer your questions, if it isn’t answered on the hundreds of niche WordPress sites to begin with.
- Frequently Updated Platform – Updates are important (Fix bugs, security, constantly improving features and performance and ensure compatibility with all WordPress products)
- A host of themes and plugins that are free – Keep costs low.
- Excellent options for premium plugins and themes – That little extra at a reasonable price.
- Easy to use and beginner friendly – Designed for you and non programmers.
- Secure platform out of box – Important for revenue generating websites
- Scalable for medium traffic – For when you grow fast and need to accommodate more traffic.
- Multiple options for hosting including managed hosting services (Managed hosting – You focus on content, your host takes care of everything else)
- Wealth of choices for running site backups – Site Backups are a big deal and extremely important for medium traffic sites, it ensures minimal downtime if your site should ever be hacked.
Do not get confused with WordPress.com, which is a blog site built with WordPress. What you are building here is a yoursitename.com as opposed to yoursitename.WordPress.com. And if you do not know the differences between the two, please read <this post that elaborates differences between two.>
Now that you have chosen the best platform for your website you can proceed with the next step.
Choose the right website name (domain) and hosting
Before you choose a domain name, you’ll need be sure of the niche you’d like to concentrate on. Selecting a niche area to focus on, is an important task in and of itself. To create a revenue generating website it is critical that you research the target keyword pool and the niche it is derived from. For the time being, just make sure it is something you like and are genuinely passionate about. And ensure that you have reasonable expertise in the subject matter involved.
You can literally register any available (not registered yet) domain name but here is something I recommend:
- Business website – If you are making a website for your business it would be best to choose a domain name that is your company name or brand. An example domain name would be YourComapanyName.com or YourBrandName.com
- Personal website – If it is going to be your personal website it would be great to go with com
- Hobby website – The sky’s the limit 🙂
Most popular domain names extensions (the end part of website address, like .com) are .com, .org, .net, but in recent years a huge amount of new domain extensions have been introduced (Wikipedia). Now you can register crazy domain names such as YourCompanyName.pizza, YourCompanyName.green, or YourName.ninja.
However, for your first website I recommend to stick with .com, .net and .org. New domain extensions haven’t gone mainstream yet and might confuse your visitors. Even some social networks, services and apps have problems displaying these new domain names that’s why I advice to avoid them, at least for now.
Choosing The Right Domain Name
The next step in our process involves choosing a domain name. A domain name is basically the URL one types into a browser’s address bar to visit a particular website.
Getting the right domain name is crucial. A few things you need to keep in mind while considering domain name choices.
- Short – Shorter names work better when it comes to remembrance and are easy to type as well.
- Brandable – Remember your domain also runs to your brand, make sure it isn’t memorable for all the wrong reasons.
- Memorable – People forget easily, come up with a name that first time visitors to your site are likely to remember.
- Catchy – You want a domain name that rolls off the tongue and describes what you do.
- Easy to type.
- Includes keyword (optional) – Identify the right keywords or combination of keywords. The closer your domain name is to your site’s niche, the better for search engine optimization (SEO)
- Niche specific (optional) – If you are writing a website about a specific niche check if there are popular abbreviations that you can use. For example, in WordPress there are many highly ranked websites with “wp” as part of their name. WPEngine.com, a managed hosting service for WordPress.
Funny domain name mistakes
Here are some domain names someone have registered without realizing what a huge mistake they have made:
- Speedofart.com – Speed of Art
- Choosespain.com – Choose Spain
- Gotahoe.com – Go Tahoe
Click here to read advanced tips about domains (Optional)
1. Now to get yourself a domain, you need a domain registrar. A domain registrar is basically someone or an organisation that reserves your right to use a domain for a given period of time. Normally web hosting companies perform the function of a domain registrar in addition to being a web hosting service provider. So you do not have to be concerned with this specifically as your web hosting service will also play the role of domain registrar.
This option is great if you have multiple domains and tend to switch your hosting provider regularly. Not that we would recommend it but it does happen. Also it is more secure to keep your hosting separated from domain registrar. In case your hosting accounts gets compromised hackers won’t get access to your domain.
2. If you are exceedingly confident of your ability to generate revenue, you might consider buying a domain name that has been parked by someone else. For various reasons, sometimes the premium you end up paying for a domain name may be well worth the expense. You can buy domain names on Flippa.com or Godaddy.com but consider this wisely, we wouldn’t want you to pay a hefty price only to find out that the domain name isn’t worth it later.
Hosting
You really have two options when it comes to hosting provider types recommended for WordPress newbies.
- Shared Hosting
- Managed WordPress Hosting
I do not recommend anything other than a shared hosting plan for first time webmasters. All other forms of hosting that you may have heard of like Virtual Private Hosting (requires reasonable technical know how), managed WordPress hosting (too costly) might not be the right choice for your first website. As your knowledge and business grows you might consider VPS or fully managed WordPress hosting but let’s leave that for another post.
Shared hosting is the way to go and later we can talk about upgrading your host. We’ve recommended two shared hosting services and have also added elaborate installation processes for WordPress with both of them. Both hosting providers offers domain registration and website hosting and that’s exactly what we need to create an awesome website.
BlueHost
To make WordPress installation process easier we have created a short video that will guide you through installation process. We might receive a commission if you decided to purchase through these links.
Click here to visit Bluehost and proceed with your first website setup.
If you had some problems understanding setup process outlined in video you can follow steps below.
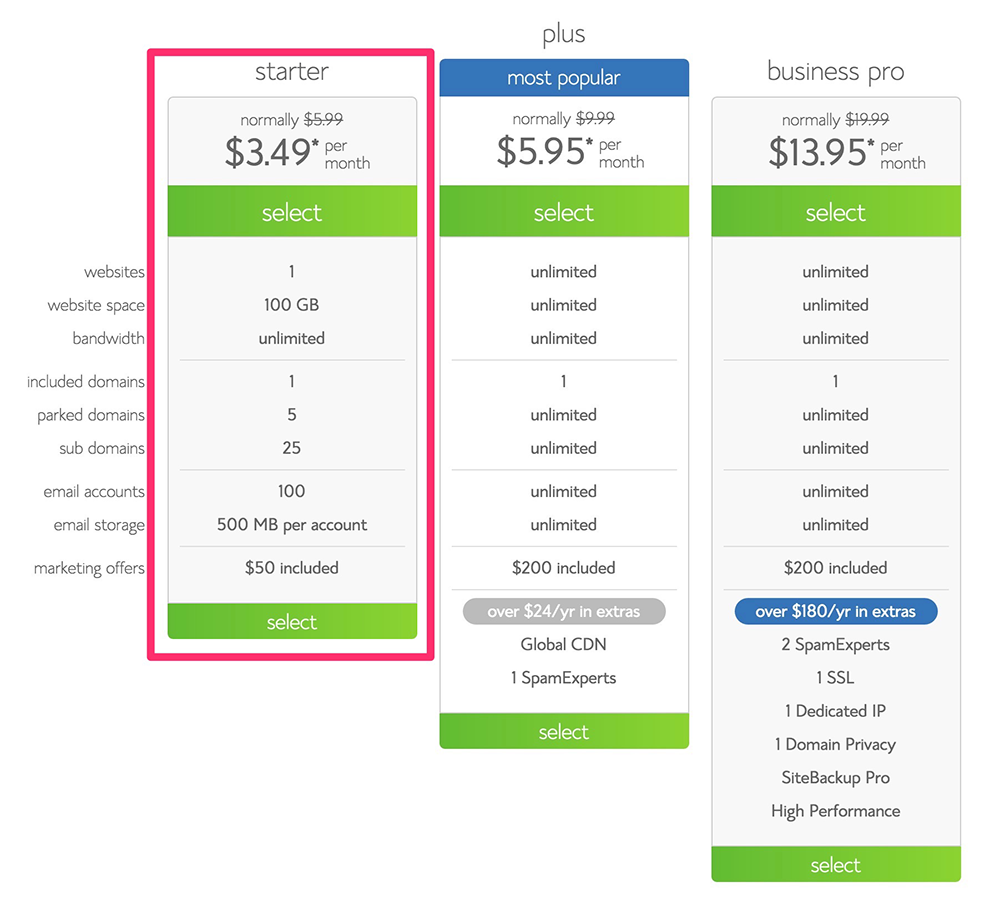
- Choose the right hosting page. I’d suggest the starter package. It offers plenty of speed, performance, functionality and storage for your first website. You can upgrade your hosting plan as your website grows>
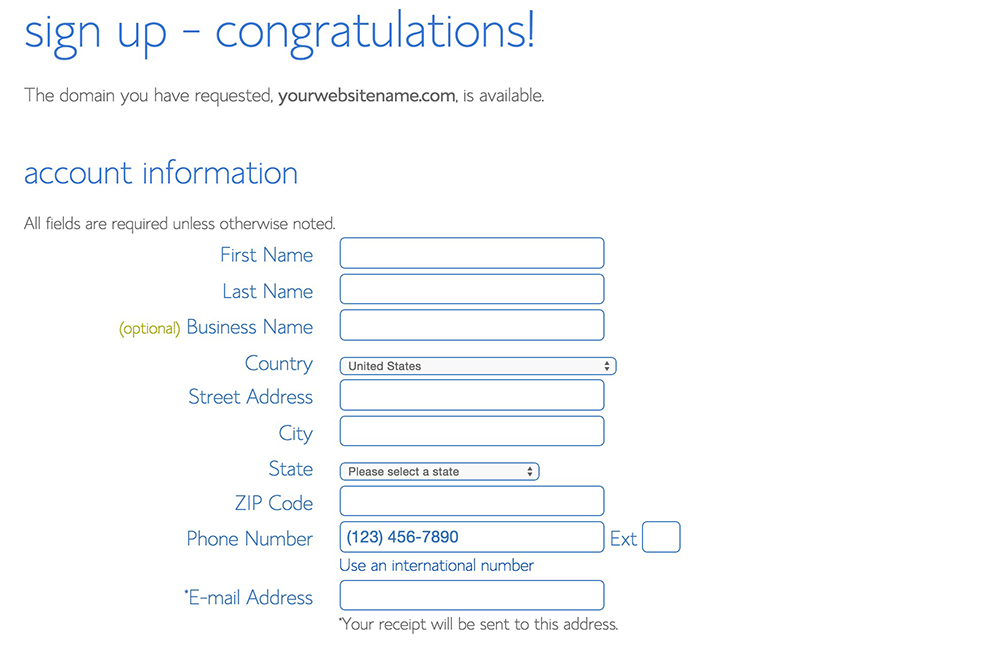
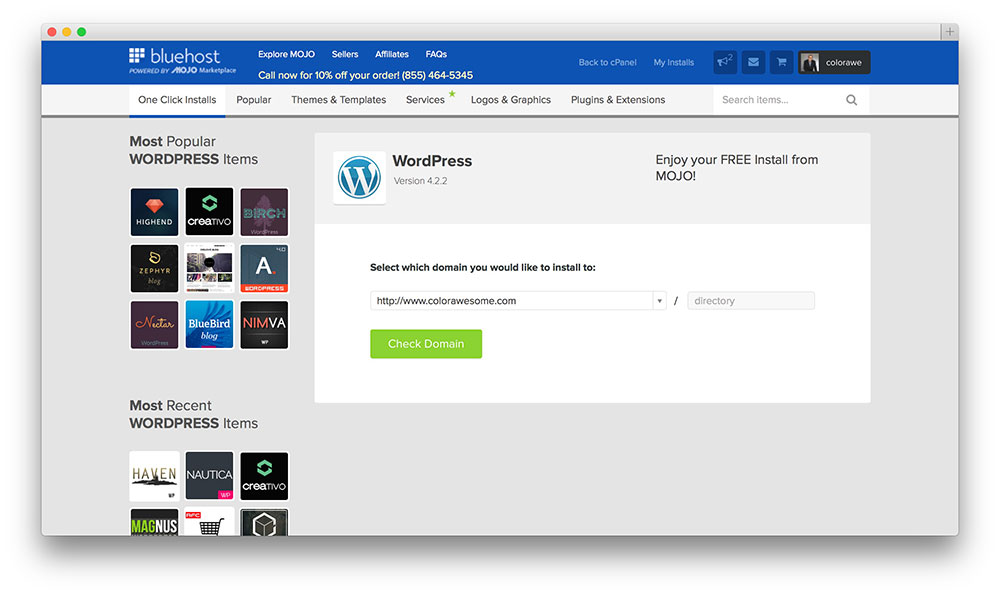
- You will be prompted to choose a domain name as you can see in example below. Double check your domain name to avoid typos.
- And on the next screens, enter your personal information and credit card details. And complete payment.
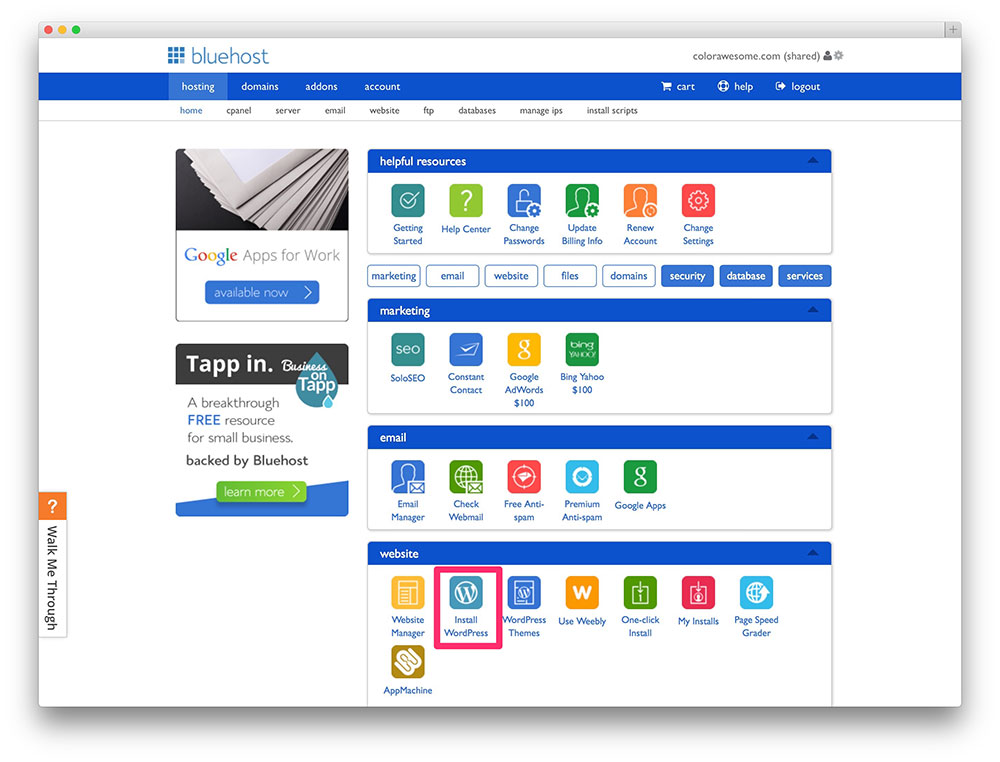
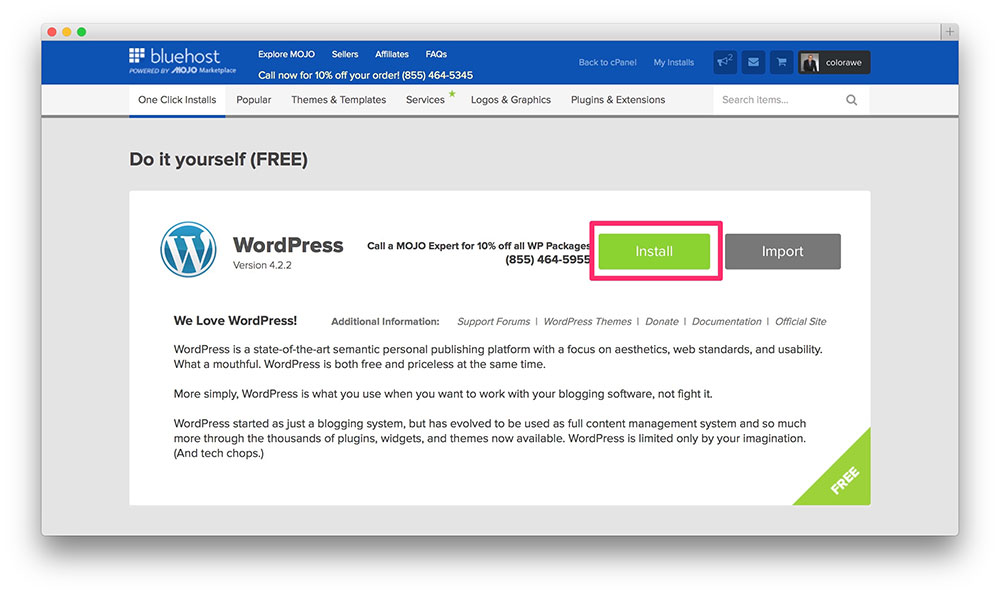
- In Bluehost cPanel (administration panel), find a button which says Install WordPress
- Click on a green Install button to proceed with WordPress installation
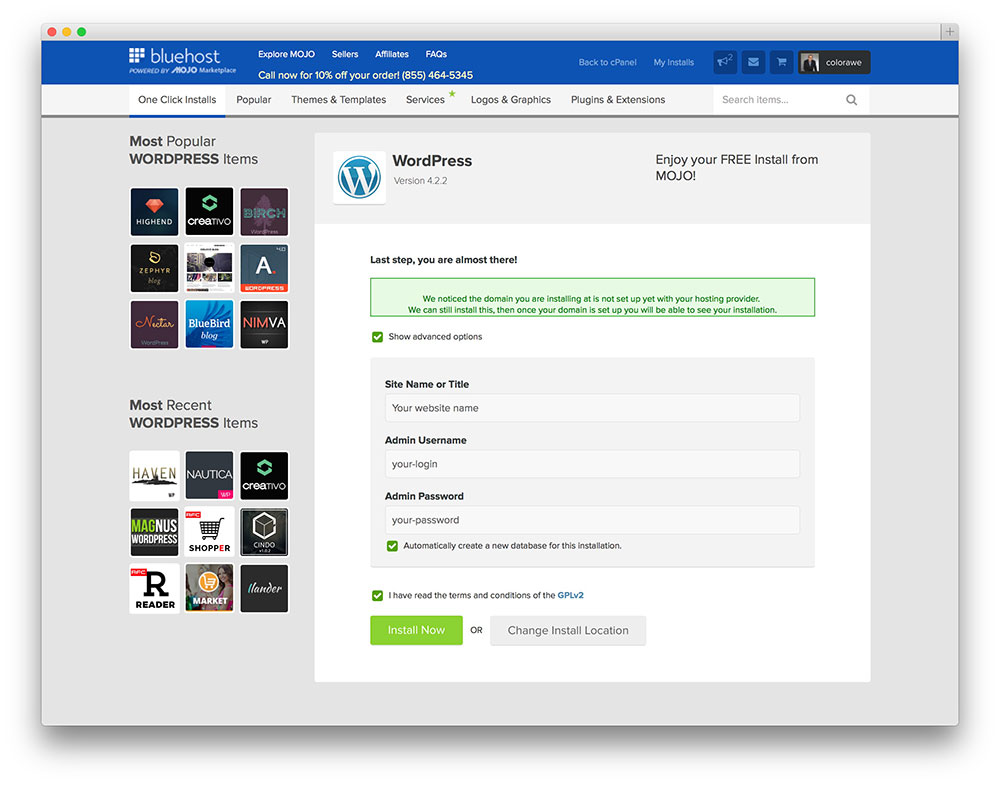
- Now select if you want to use your website with or without “www.” at front of your website name (www.YourWebsite.com or YourWebsite.com). If you can’t decide you can leave it as is. It can be easily changed afterwards.
- The details for the WordPress installation like email ID, username and password can be set. And tick all the necessary conditions under a licence agreement.
- And install.
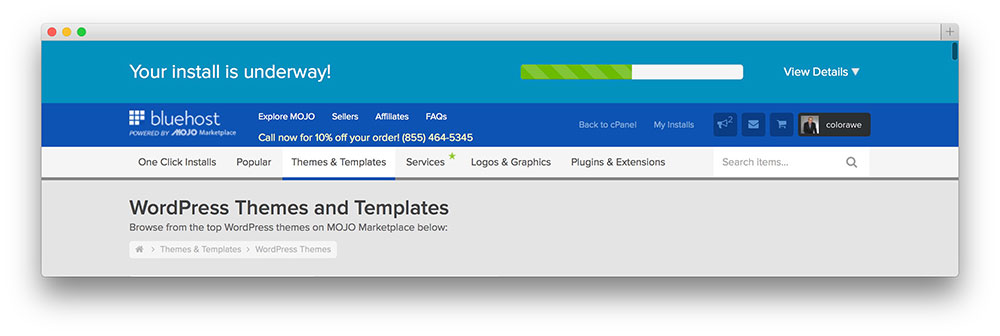
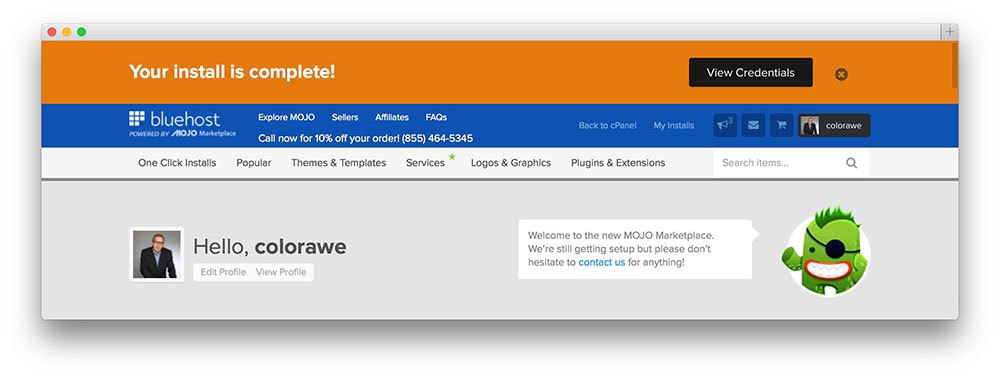
- Once installation is complete you will see a clear message on top saying “Your Install is Complete!” and button saying “View Credentials”
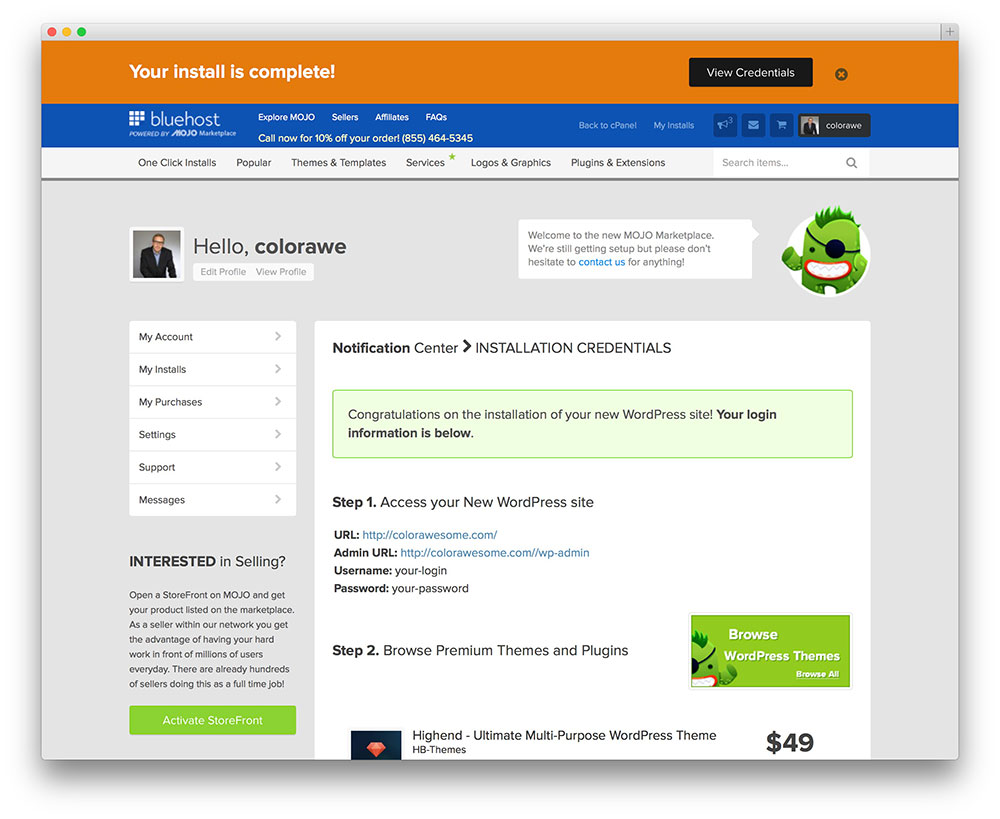
- By clicking on that button you will be sent to a page where you will be able to find your newly installed WordPress login credentials.
- Now you can login on your website by clicking link that says YourWebsitName.com/wp-admin.

SiteGround
SiteGroud’s shared hosting plan has a similar, equally easy to use WordPress installation and domain registration process. The site asks you whether you have a domain name or need to register one, in our case since you are creating your first site you need to register a domain.
SiteGround vs BlueHost
Really anyone’s pick, I suggest that you have a look at both and decide based on which ever domain registration and WordPress installation process seems easier. But personally, I feel it doesn’t matter much and you shouldn’t worry too much over which of the two hosting services to go with.
If you’d like a far more elaborate list of shared hosting service providers, check out our WordPress hosting guide.
Now that your domain is registered, hosting paid for and your WordPress installed. What’s next?
Configure your newly created WordPress website
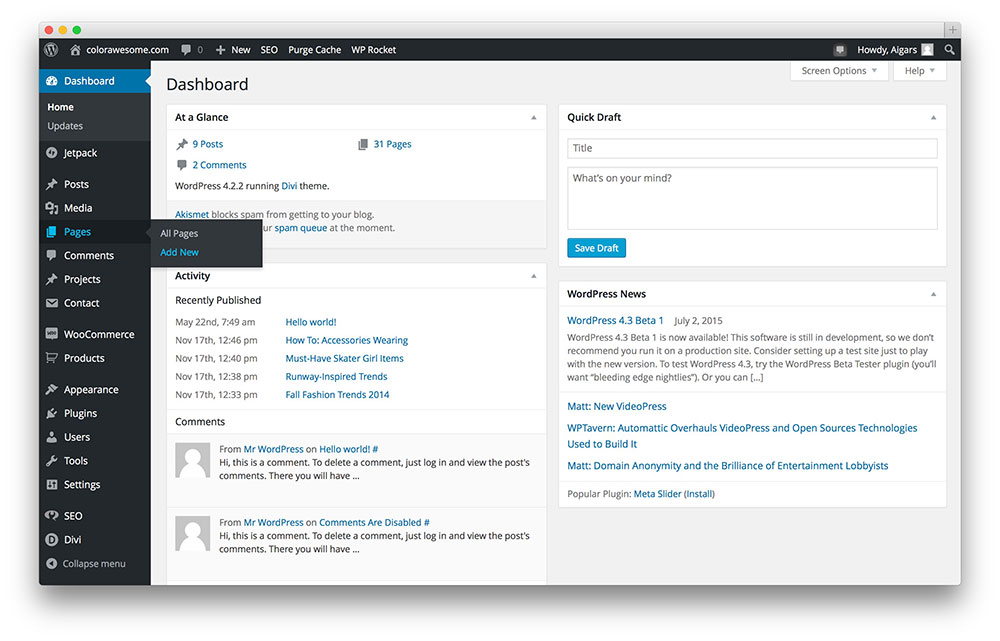
WordPress Admin Screens
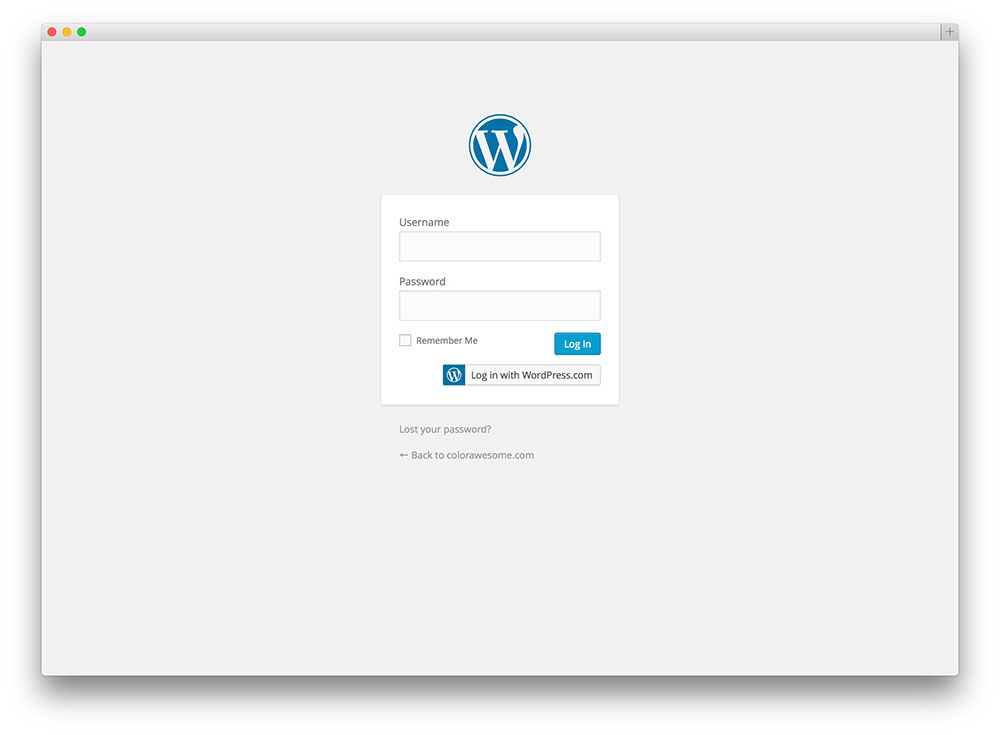
- Go to yourwebsitename.com/wp-admin.
- Type in the username and password you previously entered during the WordPress installation process.
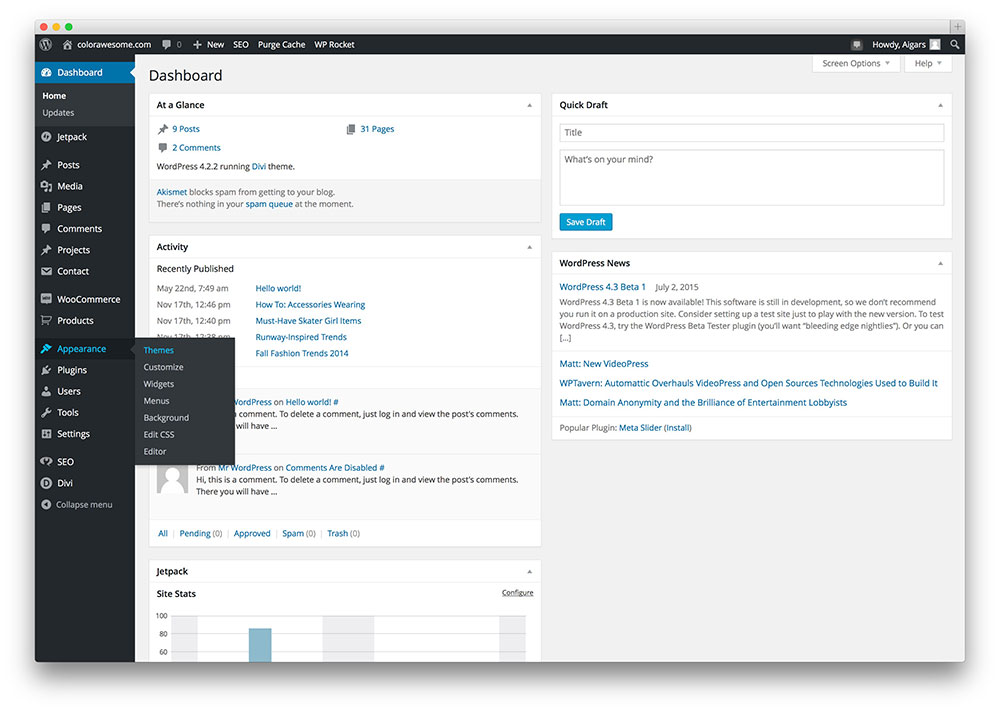
Your WordPress admin menu is available on the left side of the screen. Allowing your cursor to linger over them will open sub menus.
- Dashboard
- Posts
- Media
- Links
- Pages
- Comments
- Appearance
- Plugins
- Users
- Tools
- Settings
That is a lot of stuff which you deal with. But I’ve promised to get your site up and running. So for the purposes of this post I will not be talking about Settings, Tools, Users or Your Dashboard.
I will talk about the rest of the menu options which are part of your WordPress menu. Let’s get started.
Customizing your site’s Appearance and activating a WordPress Theme
Themes (Appearances > Themes)
- Open Appearances > Themes. From here on have a look at the heading of each subsection if you have doubts with regards to accessing a particular part of the WordPress menu from the admin screen.
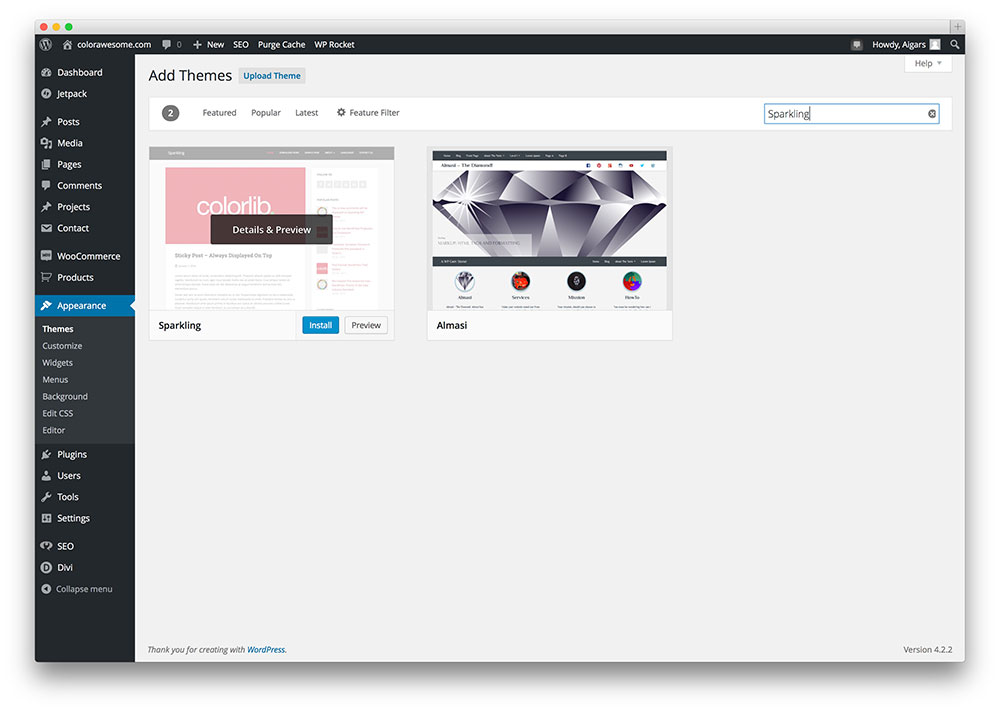
- And click on the “Add New” button on the top. And choose from one of the themes displayed or search for a specific theme. For a list of awesome free themes you should check this page.
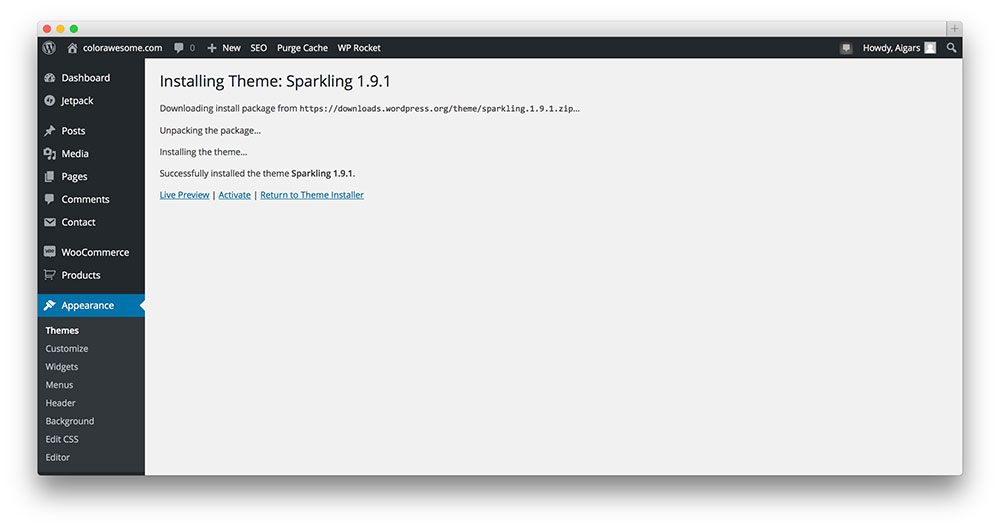
- Install a new theme that you fancy and activate it.
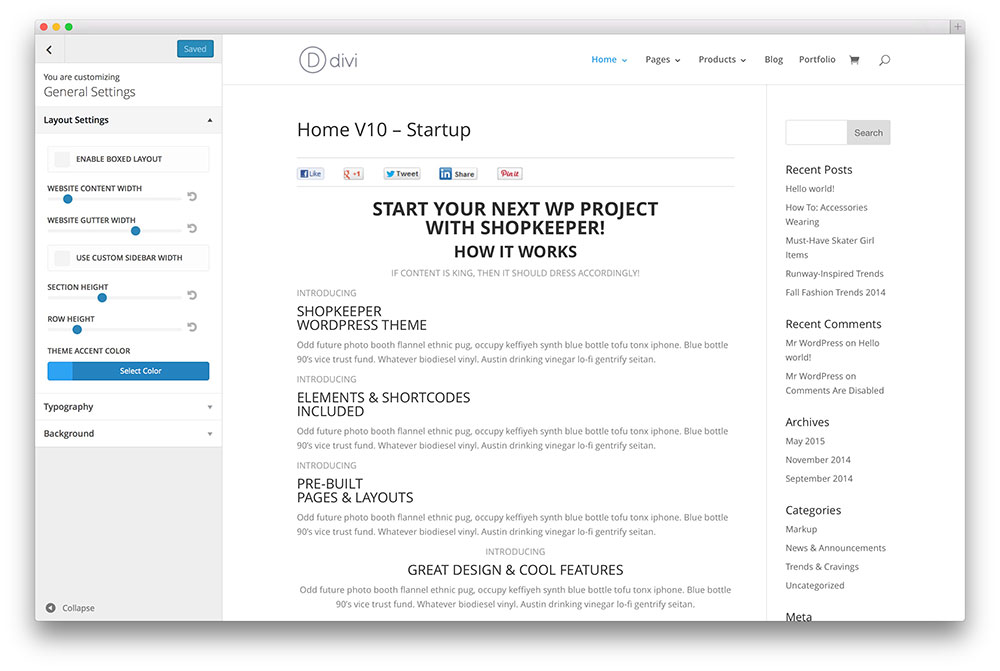
- The next part involves customization of a theme. You can access this under from Appearance > Customize. You can do a number of things to your site’s appearance from here. But that’s not the crux of this post, a theme is sufficient to start a website.
Widgets (Appearances > Widgets)
Widgets are preset modules or pieces of code that add to a certain function which will prove useful for your website in some capacity or the other. Your sidebars, footers and headers can be loaded with widgets.
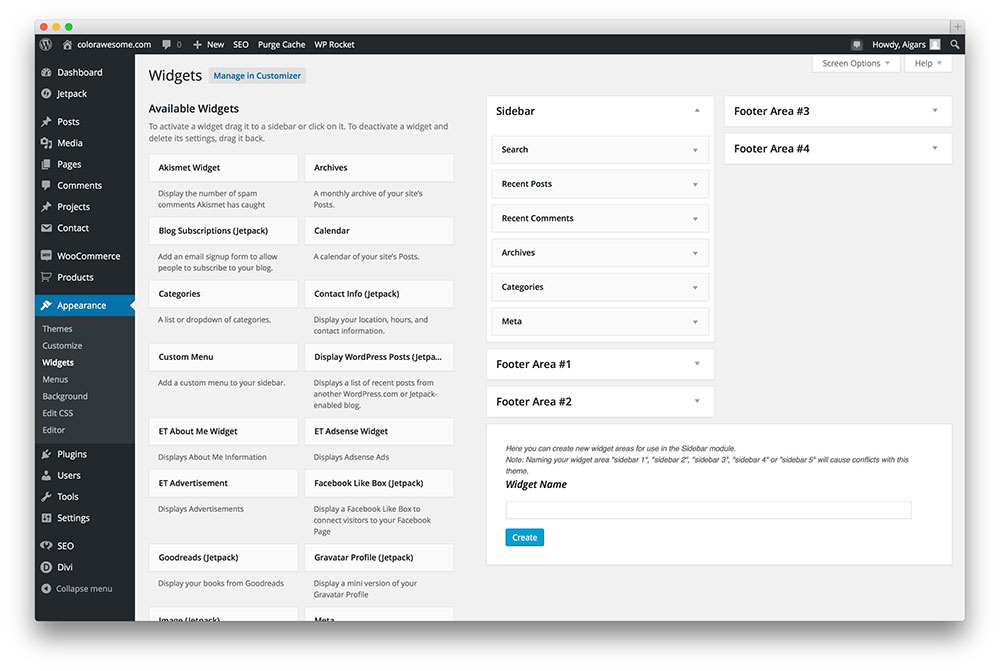
As you can see in the above screenshot, there 6 widgets in the sidebar. These widgets include a search bar, a recent posts widget, recent comments, archives, categories and meta. Then you can see 4 footer areas where you can add widgets just the same. The number of footer, header and sidebar areas available to you depends on the theme you are using.
Widgets are not plugins, but they are small chunks of code that add a bit of function. Sometimes it may help with navigation, sometimes with social media, you can even use to add HTML to a text widget which will function as coded to do so. So widgets are a very useful tool but you need to learn a bit about them before you can use them to the fullest.
Menus (Appearances > Menu)
Menus are an extremely important for any website. They offer a means to navigate your site and its content. After all, what’s the point in creating captivating content if your visitor can not find it easily on your site. Bad menus and navigation can lead to a high bounce rate (the number of visitors as a percentage who leave your site after just viewing just one page).
You may have seen websites with menus on the top or the side and even at the bottom. We can do all of this.
You’d like to include pages like “About”, “Blog”, “Contact” and “Our Services” as part of your primary menu. Any page you’d like displayed on your menu can be added. The number of menus and their placement on your site depends on your WordPress theme.
You can add all the stuff that you see on the left to the menu ranging from pages to products as part of your menu. Again what you can include as part of the menu depends on your WordPress theme.
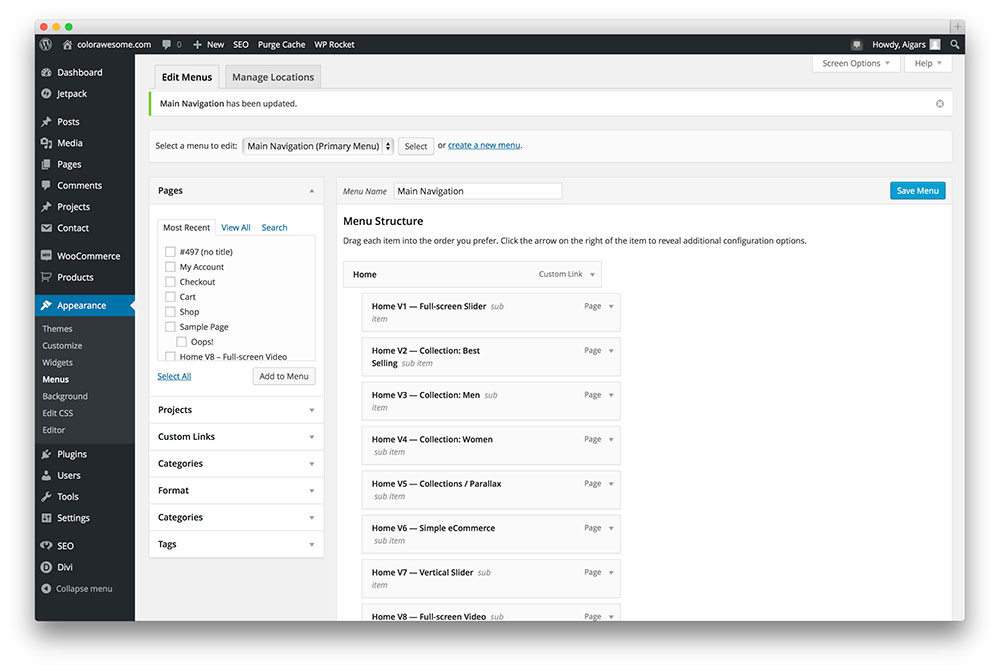
A good menu,
- Is concise and minimal.
- It is a representation of all your site’s offerings.
- Very intuitive to use and maneuver around your site.
Keep that in mind and you should be fine.
Background (Appearances > Background)
Many website choose to have plain single color background and I am big fan of that.
The Colorlib blog has a plain white background and it keeps things simple. But the homepage of the site is pretty awesome with a purple background and our tagline.
Websites that are media heavy, examples would include photography sites or portfolio websites have great backgrounds. If you want your website to send across a powerful visual cue to your audience use a powerful background image. Else you can simply opt for a plain color which is appropriate for any blog that emphasizes readability.
A background should not be confused with a slider image which is basically a constantly changing image that moves across or your screen or changes with fancy animation.
Adding New Plugins (Plugins > Add New)
Plugins are a scripts or pieces of code written to perform a very specific function or set of functions on your website.
A simple example would be social sharing plugin, it helps share your content across different social platforms and helps get the word out that your content is awesome. Similarly, people have developed plugins for search engine optimization, security purposes, creating and maintaining a portfolio of images, to create contact forms, for caching the list is endless.
If you want to read a detailed list of plugins that we think is absolutely essential, read this comprehensive list of essential plugins.
Adding Pages (Pages > Add New)
Pages on a website help divide your website into a requisite number of pieces to present the different sections of your site’s content. Pages are to themes like widgets are to plugins. With pages you can create specific template styles that can be called on command for different purposes that require the same or similar design. Pages are more than posts and are used for specific purposes on your site. You can create pages specifically to cater to the requirements of a Contact Us Page or perhaps create landing page.
And you are greeted by a New Page, which you can now fill up. From this new screen, you can create a new page and assign page attributes.
If you either need to create a template that you’re likely to use often or need to recreate a section of your site for a specific purpose, creating a page is the way to go.
Comments (Access from WordPress menu)
Websites need readers to make them successful. Comments are a very powerful means to establish a great debate on your site and this only further adds value to your site. Hardly, one percent of the traffic that visits your site will ever comment. And that is assuming that the content is great to begin with. Driving interaction with passive readers on your site is difficult and takes time and effort.
A great post with a pre-existing comment history helps your site receive more comments. Aigars wrote an awesome post on Colorlib a while back, yet till this day it still keeps receiving comments and continues to be a great source of traffic.
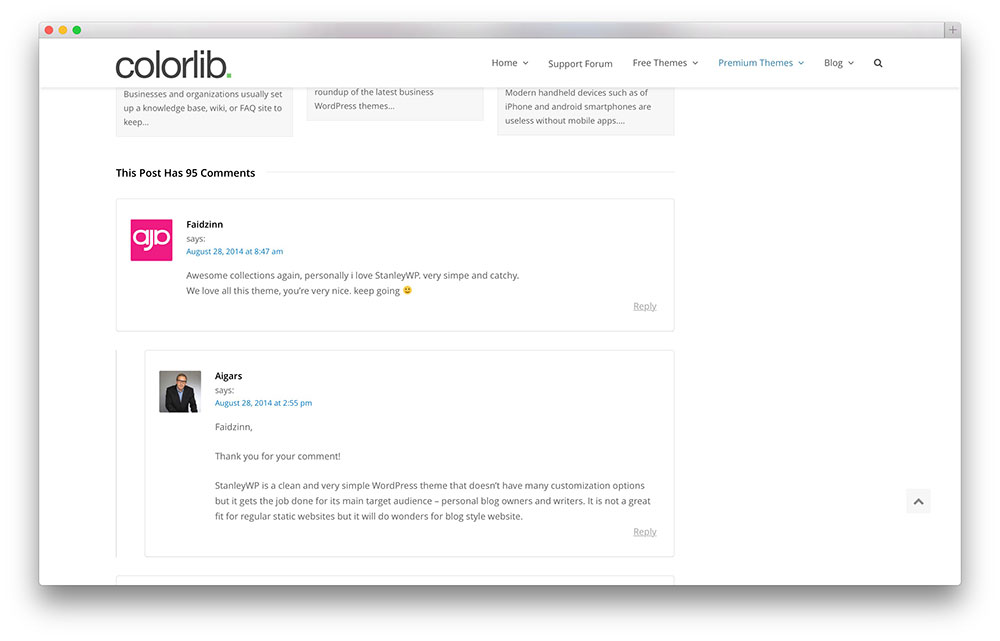
And remember, WordPress allows you to link your site when you comment on another person’s blog. And this may send visitors your way, if you play your cards right and make genuine attempts to offer something constructive. For this same reason, many people will leave their comments on your blog as well.
If I feel your content is great and a particular post that you’ve written is awesome, then I’ll almost jump at the chance to leave my comment first and best anyone else to first comment. Because I know eventually it will lead a few visitors back to my site.
Comments are a great way to build an awesome readership and a loyal following for your site.
Adding Content
Content is king may be a cliched line. But it is true now more so than ever before. There are many more websites now than there ever were before. You name a niche, any niche and it is bound to be saturated to the hilt with websites producing content about said niche. WordPress is a very profitable niche. Why? 50% of websites use it and many of them are new to WP. WordPress newbies and even intermediate level users require a few resources to help them get started up and make changes to their WordPress sites, not too dissimilar to the content on Colorlib 😉 But a website like Colorlib works well and generates revenue only when we offer value to our readers.
We publish a great number of articles on premium WordPress themes and should you choose to buy one of them after clicking on our links we receive a small commission on your purchase. But truth be told, our most popular and widely read articles aren’t the ones that describe premium WordPress themes or plugins, rather they are WordPress tutorials and posts dedicated to free themes, plugins and other WordPress related articles. Because it is only when we offer value to readers that our site grows.
So based on your site’s niche and your expertise, you need to produce content that genuinely offers value to would be readers. If you intend to create your site purely for monetary purposes, it will not be successful in the long run. No wait a minute, it may still be profitable but certainly not as successful as it could have been had you tried to genuinely help your audiences. So focus on good content.
Pick your niche and offer great value to your readers. And watch your traffic grow steadily and if you are lucky, perhaps even go through the roof!
So how do you publish your content on WordPress? What are the formats available to you apart from just plain ol’ text?
Posts (Posts > Add New)
The beating heart of your site or most sites anyway. At the end of this tutorial when all’s said and done, you’ll be here to populate your site with posts. WordPress has a very easy to use posting mechanism and this one of the reasons, it is so popular.
You have two ways in which you can write your posts: one is the visual editor and the other is HTML editor. You can opt to use the visual editor to begin with, but you should know the HTML editor (referred to as text editor) is a very powerful tool to help you create the right formatting for your posts. The sooner you are comfortable with the text editor, the better of you will be. You may notice I am using the visual editor and truth be told, once I’ve added all the necessary formatting I prefer the visual editor.

The visual editor is very much similar to most text editors and permits you to add bold / italic effects to your text, change its font, add bulleted lists and numbered lists, align content differently and add hyperlinks. There is also a distraction free writing mode which gives you a fullscreen version of the editor.
Categories (Posts > Categories)
Categories are a means to divide your content. Categories are important when your site publishes content on a number of issues. You can add categories from your Post editor or you can access it under Posts > Categories.
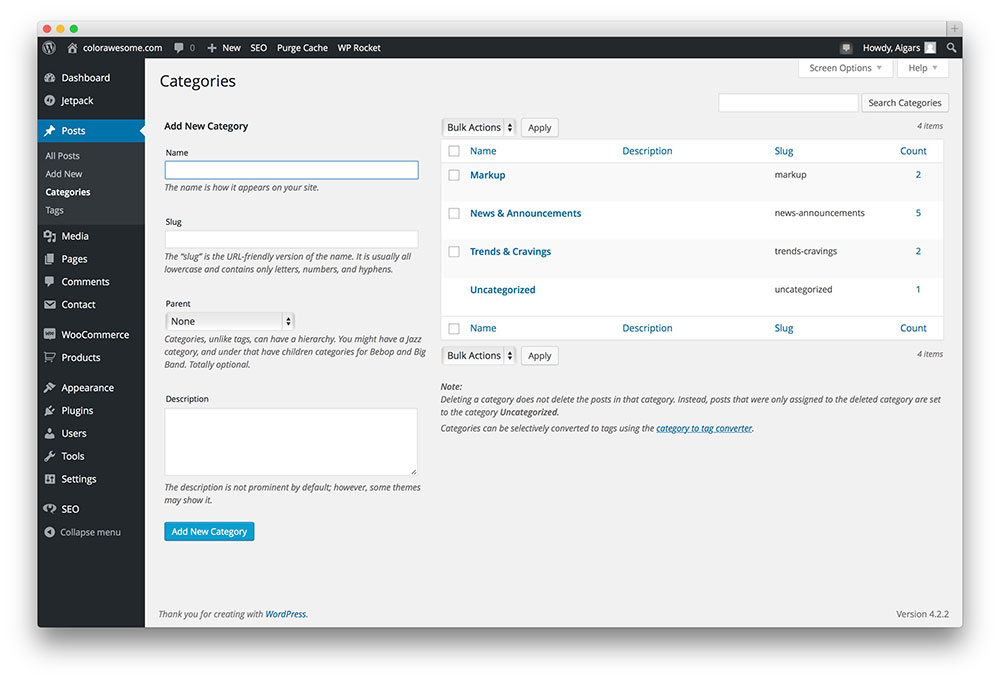
Now you can name the category to create one and then you can add a slug which is basically a URL add on of sorts for all your site’s posts on that specific category. For example, if I know that Colorlib produces a lot of theme collection content, I can Google search “Colorlib + any keyword/category” and the first search result link is – https://colorlib.com/wp/category/collections/ . With this I can view only the posts that have been published under the category, “Collections”.
So it is a very effective way to divide your site’s content and make finding stuff on your site much easier for a visitor.
Tags (Posts > Tags)
Tags are very similar to categories, except each post generally has its own set of tags. Tags are a tad more specific than categories but that apart they are the same and they aid in helping visitors find your content more easily.
Media (Media >Add New)
Media as in photos and videos are important to normal websites. They are even more so for media heavy websites. Adding media is easy with WordPress. You can either add media from Posts or you can add media directly to the media library.
You can add the image title, a caption, description to the image. But it is also important you also add the alt text which helps search engines identify your image. It is a small step in ensuring good search engine optimization.
There a lot of effects and stuff you can do to your imagery like make it pop up or use a lightbox with WordPress plugins. But that’s for another day.
Your Profile
Setting up your WordPress profile. This is rather easy to deal with. You can edit your profile from the “Edit Your Profile” on your WordPress admin screen on the top right hand corner. You can describe yourself and add the necessary social media links as well.
And to add a profile picture for your WordPress ID, you’ll need to get a Gravatar account. You’ll need an account from WordPress.com with which you can login to your site’s admin panel.
We have far too many inhibitions, starting stuff is one of them. It opens the door to failure.
Creating the website and generating revenue is no joke. It is hard work, sometimes seemingly unrewarding work.
Over the next few weeks and months, we’ll be launching our “Getting Started With WordPress” post series to help you out.
And apart from that if you need anything else, do let us know in the comments below! Aigars and I will always be happy to help you out 🙂
[ad_2]
Source link