10 Steps to Creating an Online Course [+ Templates]
[ad_1]
Online learning, or eLearning, offers several advantages to today’s learners, whether they are in the workplace, an academic setting or anywhere else.

The benefits of setting up online courses include the ability to scale instruction to reach a wider audience than traditional live, classroom-based training, and at a lower cost too.
By making use of interactive elements such as interactive quizzes, dialogue simulations, scenarios, and multimedia, eLearning is a highly engaging medium that can drive customer engagement and conversion.

With these many advantages, it’s no surprise that the eLearning industry is booming. If you’re ready to start creating online courses, follow our 10-step strategy to set yourself out on the path for success.
You can then start creating online courses’ materials for your business with Venngage for Marketers. We offer templates in presentation format that can easily be exported as PowerPoint files to be used for any online courses.
Click to jump ahead:
- Decide on the course topic
- Define learning goals and objectives
- Organize the work with SMEs and stakeholders
- Create an online training course storyboard
- Write the script
- Make an online course in an authoring tool (+ customizable course templates)
- Add assessments
- Publish the course
- Share the course
- Collect feedback about the course
Step 1: Decide on the course topic
The first thing you need to do is define the topic of the course.
There may be different approaches to this issue, depending on what you’re developing it for. For example, if you’re going to create your own online course to sell it online and make money, the smartest thing is to choose a niche in your expertise and a topic that you know inside out.
Venngage, for example, offers courses and webinars for visual communication, infographic design and marketing best practices:

To start design your course, think of the audience you’re targeting and what problems they may be facing that you can solve.
For example, you might find that your customers want to use visuals in their communications but they’re lacking design skills. You can solve this problem by offering an easy design solution and a comprehensive course on how to use the platform for non-designers.
Conduct an in-depth analysis of what you can provide to your customers and what differentiates your course from others. This will serve as the base for your next steps, which involve defining course objectives, writing course script, and more.

Note: Based on the content, you might be better off creating a webinar instead of a course. Check out our comprehensive guide on webinars and how to best create one.
Of course, there’s another approach to choosing a topic if you’re going to create online classes for employee training. Here, you need to strengthen your employees’ weak points and foster their growth zones.
Consider using an employee skills training matrix to help you easily identify existing skills, find potential skill gaps, and decide on what course an employee needs to take to improve their skills.

Step 2: Define learning goals and objectives
A learning objective is a concise way of stating what the expected outcome is for the learner upon completion of the course; in short, it’s what they’ll be able to do after gaining skills or knowledge during the instruction.
In the workplace, this often corresponds to behavior when on the job. For example, learning objectives could include:
- Describe the features of a new product
- Change a tire on a car correctly
- Select the most appropriate item to recommend to your customer based on their unique needs
You may notice that each objective begins with a verb, or an “action word.”
Additionally, each objective is something that can be observed and measured. It’s clear when someone performs these tasks correctly, and you could provide feedback or guidance if they are unable to perform the task (hint: connect your learning objectives to your assessment, which we’ll discuss later in the article).
For the best results, when writing learning goals and objectives, think SMART. SMART goals, with their detailed structure, give a clear idea of what your learners need to achieve.

Learning objectives provide a roadmap for both you and the learner alike.
As the designer, learning objectives are your north star that determines which content you should and shouldn’t include in your course.
Objectives also provide similar guidance to your learners by answering the question, “What’s in it for me?” and telling them what they should expect to gain from the course.
Step 3: Organize the work with SMEs and stakeholders
Throughout the course development process, you’ll work with both subject matter experts (SMEs) and stakeholders. We define each role as:

For example, if you’re creating a sales training course, your SMEs may include the VP of Sales, sales managers, and even the salespeople themselves. Your additional stakeholders might be the executives who commissioned the course and/or the project manager who is tasked with overseeing the rollout of the new training initiative.
It’s important to define roles and responsibilities for both your SMEs and stakeholders early in the design process, to help ensure smooth course development.
By determining who should be involved at what point in the process and what their responsibilities are regarding providing and reviewing the course’s content, you’ll run less risk of revisions and reworks once you start building the course.
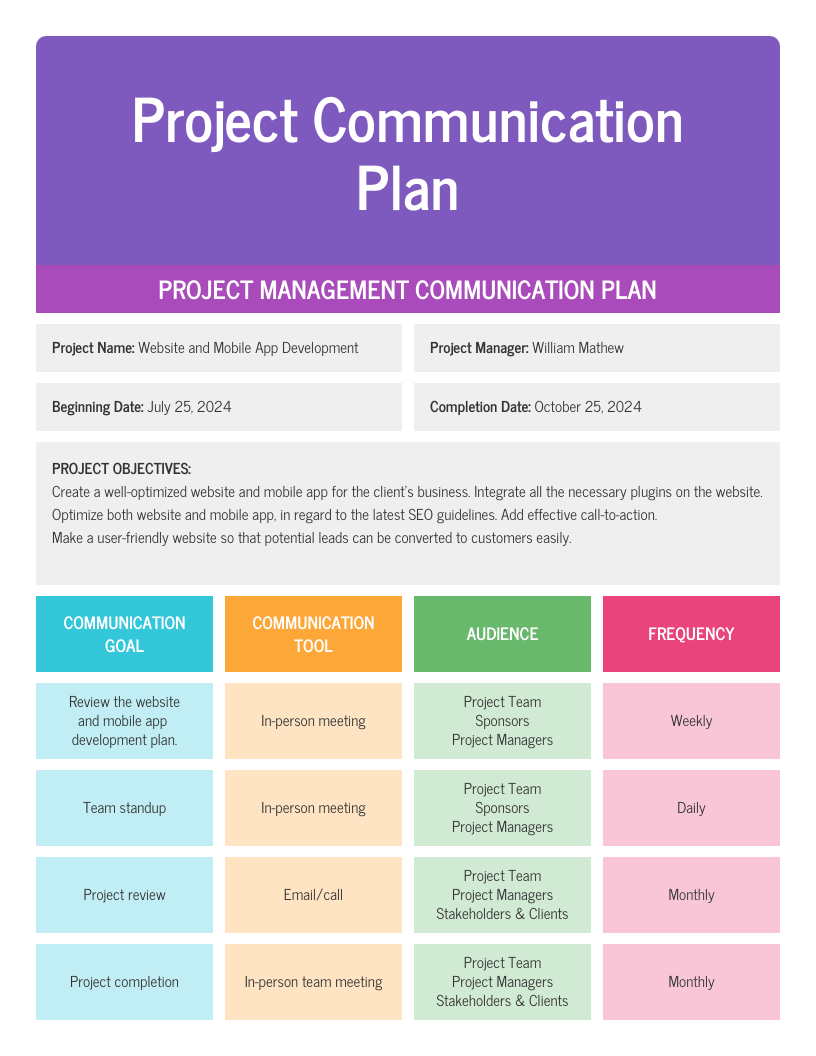
Customize this communication plan and share it with your SMEs and stakeholders to help them get involved in the process:
Step 4: Create an online training course storyboard
After compiling all the information that will go into your course, the next step is to map it out in what is known as a “storyboard.” This could be in the form of a document or presentation deck, or even a rough prototype or mock-up of what the final product could look like.
The purpose of the storyboard is for your SMEs and stakeholders to review the course content and sequence of activities before building anything in the authoring tool.
In addition to the written content, also include any images, multimedia (such as videos or podcasts), and navigational directions for how the learners will progress through the course. You will want to give your reviewers a complete understanding of what the course and each microlearning module that it will include will look and feel like.
Here’s an example of the eLearning storyboard for an intro slide in the course:

You can also use this template to create your storyboard, add images, icons or illustrations to it and export it as a PNG or PDF that you can share with your stakeholders:

It is much simpler and faster to make changes in a document at this early stage than it is later in the process. The investment of time spent creating a storyboard is time well spent, as you will be rewarded with a faster course building and review experience later in the development process.
Step 5: Write the script
Similar to a play or a movie, your course script includes all audio narration as well as all on-screen text. The instructional designer must write this course copy based on the information provided by the SME(s), which could come from any number or type of source files.
During this step, it’s important to consider not only how the words sound, but how they look on screen. Here are some tips on how to write a good script for your online course:
Read the script out loud to yourself as you write it
If you get tongue-tied or confused while reading it, then it won’t sound good to your learners either.
Aim for short, concise sentences
If your learners are likely to complete your course on mobile devices, you may also want to make use of short passages of text that learners can read with a minimum of scrolling.
Write like how you (and your audiences) speak
Ultimately, your course’s content will be more engaging and effective if it reads like it was written (and narrated!) by a human being, and not a robot.
Think of your audiences while you’re writing the script as well, and make sure you cover the “What’s In It For Me” aspect well in your copy.
Related: How to Design an Outstanding Webinar [Free Ebook + Templates]
Once you’ve done writing your script, you can use this template to help you write a course outline that can be shared with your stakeholders or use in the official course:

Step 6: Create your online course in an authoring tool
Once your storyboard and script have been approved by your stakeholders, you’re ready to begin building the online course.
The authoring tool is the software in which the course comes to life. If you have some experience in instructional design, you’ve probably come across with tools like Articulate 360 or Adobe Captivate. They are quite popular but definitely require training for a novice course developer.
If you’re not ready to invest time in training and want to start building courses with no prior knowledge in instructional design, you might want to try a tool with a familiar interface and no learning curve.
For example, iSpring Suite uses PowerPoint as a basis. So, you can build a course the same way that you create a presentation and then publish it to an online format in a couple of clicks.
A slide from a course created with iSpring Suite
To make content development even faster, you can use ready-made course templates. For instance, iSpring has its Content Library with templates that include basic course elements: a title slide, a table of contents, chapters, a timeline, and more.
You can also customize Venngage’s easy-to-edit webinar templates, export your design as PowerPoint slides and use them for your courses. Here are some great ones you might want to use:
Product onboarding webinar presentation template
This template was created for Venngage’s Infographic Masterclass, but you can easily edit it to use for any product onboarding courses:

Phishing threats employee training template
You can use this template as is or add any additional slides easily. With a Business account, you can apply your branding elements to your design and export it as a .pptx file to present with PowerPoint or Google Slides in just several clicks.

Anxiety presentation online course template
This can easily be customized for any courses that tackle a new or complicated concept/process that needs explaining for your employees, especially new hires:

Here, you’ll also find some chart and other infographic templates that you can leverage for your courses to make them even more effective and professional looking.
For example, you can use this simple flowchart as a slide or a separate PDF for your course on workplace violence policy and program.

You can easily customize this template for your course overview or for a course that spreads over multiple sessions (click to see the full infographic).

Step 7: Add assessments to your online course
Think back to your learning objectives. What measurable, observable actions are your learners expected to perform upon completion of the course?
It’s now time to create assessments to determine if your learners have mastered the content or not. Many authoring tools typically include a quiz maker that allows you to build online tests.
For example, iSpring Suite provides a variety of assessment options, ranging from traditional multiple-choice and true/false style tests, to fill-in-the-blank and moving objects on the screen (known as “drag-and-drop”).

A slide from a quiz created with iSpring Suite
Assessments can happen during the presentation of the course as well, especially if you’re presenting live and trying to engage your learners. Before introducing this slide, for example, you can add another slide that asks your learners different ways they’ve used to spot a phishing email:

Assessment can be as active and impactful as the instruction itself, and the creation of the assessment can be as easy as the course creation, thanks to the inclusion of pre-built common assessment methods in the authoring tool.
The use of feedback based on learners’ answers or overall performance can also add an interactive, educational component to the overall experience, serving to reinforce any important concepts.
Step 8: Publish the course
Once your course meets the approval of your stakeholders, it’s time to publish!
This is the exciting moment where your course goes live for your learners or for a pilot group. Based on how simple course creation and the creation of assessments are, it may come as no surprise that publishing is just as easy.
Simply click “Publish,” and your authoring tool will output a file that is ready to be uploaded to your hosting service, such as a learning management system (LMS), website, or even YouTube.
Step 9: Share the course
As mentioned, there are different platforms for online course sharing. We’ll consider the most convenient and effective ones, depending on various cases:
Academic LMSs
These platforms are designed specifically for teaching students. Some popular academic LMSs include Moodle, Blackboard, and Schoology.
Acamedic LMSs allow tracking students’ progress through their grading system and provide gradebooks for monitoring attendance and assignment results.
They also have the time frames that are specific for educational institutions like semesters, trimesters, and quarters, as well as capabilities for creating student groups for class projects.
Corporate LMSs
Some popular corporate LMSs include iSpring Learn, Docebo, TalentLMS, and Adobe Captivate Prime. These platforms provide access to learning materials online and automate various aspects of training processes, but they’re typically more flexible from the point of view of course timeline and reporting to fit all business needs.
Course selling platforms
These are online course hosting platforms specifically designed for managing and selling training content. They have everything a user might need to build, host, and sell courses. Here are just a few big players: iSpring Market, Udemy, Thinkific, Teachable, and Kajabi.
Step 10: Collect feedback about the course
After your learners take a course, ask them to give feedback on how they liked it. This experience will help you understand what is good about your course and if it needs to be improved.
To collect feedback, you might create a survey with an authoring tool of your choice or Google Forms and share it online with your learners. Or you can use the Venngage template feedback form and tailor it to your needs:

Final thoughts: Create an effective online course full of visuals to best engage learners
eLearning is a powerful solution businesses to engage, increase and convert their audiences.
Whether you’d like to create online courses, online quizzes or both, following a strategy for the design and development of your content helps to ensure high-quality results.
Empower your learners to achieve both their goals and the goals of your organization by presenting them with content that is engaging, interactive, and relevant to their needs. With most people learning better with visuals, it’s best to incorpo27rate images, icons and illustrations in your course materials.
You can start designing your own online course for free with Venngage. There are lots of fully customizable templates that you can easily edit with Venngage’s drag-and-drop editor, no design experience required.
[ad_2]
Source link


![6 Steps to Create a Strategic HR Plan [With Templates]](https://venngage-wordpress.s3.amazonaws.com/uploads/2022/08/3e611956-2d22-469e-bbea-a3d041d7d385-1-1-1.png)


